Unlocking the Magic of Fool-Proof Carmelita Bars: Your Go-To Chewy Caramel & Chocolate Recipe
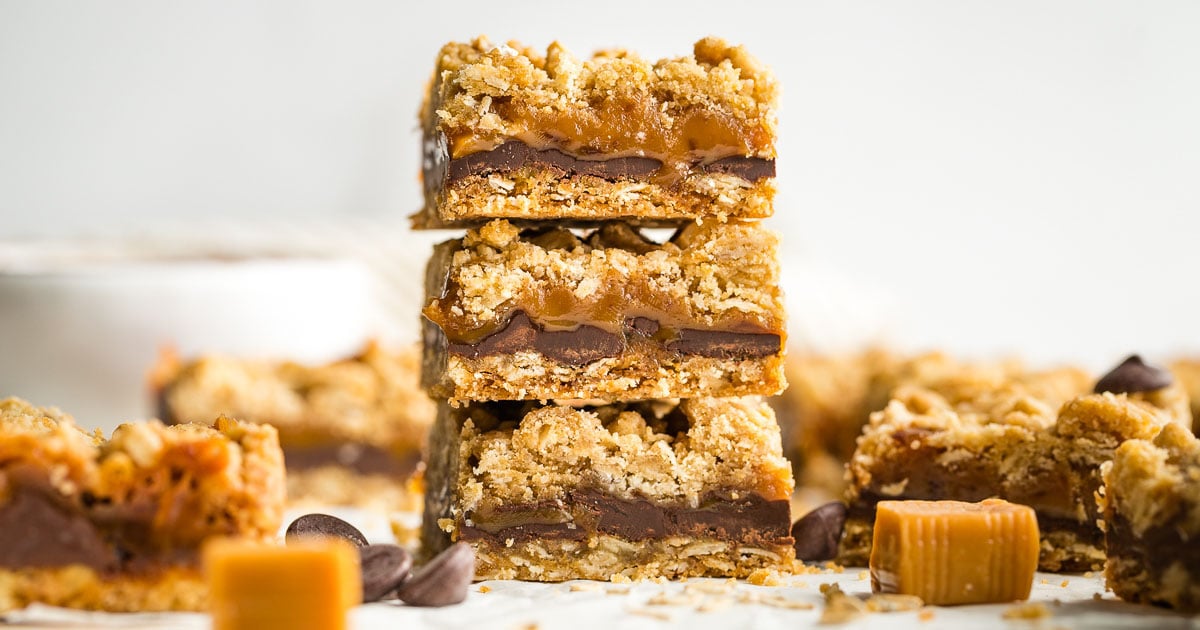
Imagine a dessert so utterly irresistible that it practically guarantees rave reviews and instant popularity. A treat where layers of buttery, chewy oat crust cradle a luscious, gooey caramel filling and a generous sprinkle of rich chocolate. We're talking about the legendary Carmelita Bars – a true masterpiece of texture and taste that’s surprisingly easy to make. Forget complicated baking projects; this chewy caramel treat earns rave reviews for a reason: it's fool-proof, utterly delicious, and an absolute game-changer for anyone with a sweet tooth.
Often hailed as "life-changing," Carmelita Bars live up to the hype. The simple combination of everyday ingredients transforms into something extraordinary, hitting all the right notes: sweet, salty (if you use salted butter or add a pinch of flaky sea salt), chewy, and soft. Whether you're a seasoned baker or just starting your culinary journey, this recipe promises success and smiles. Get ready to impress everyone with these unbelievably good bar cookies!
Essential Ingredients for Carmelita Perfection
Crafting the perfect batch of Carmelita Bars starts with understanding the role each ingredient plays. While the recipe is forgiving, selecting the right components can elevate your bars from great to truly exceptional. Here’s a detailed breakdown of what you'll need and why:
The Foundation: Flour, Oats, and Brown Sugar
- All-Purpose Flour: This forms the base of your crumbly, buttery crust. While all-purpose is standard, some bakers enjoy mixing in a small amount of whole wheat flour (e.g., 1/2 cup whole wheat with 1 1/2 cups all-purpose) for a subtle nutty flavor and a slightly denser, heartier texture.
- Old-Fashioned Rolled Oats: This is a critical ingredient for the signature chewy texture of Carmelita Bars. Do not substitute instant or quick-cooking oats! These finer oats break down too much during baking, resulting in a mushy, undesirable texture rather than the robust chewiness you want. For a deeper dive into choosing the right oats, check out our Carmelita Bars Guide: Choosing Best Oats & Caramel for Perfection.
- Brown Sugar: Whether you opt for light or dark brown sugar, its molasses content adds moisture, depth of flavor, and a wonderful chewiness to the oat crust. Dark brown sugar will impart a slightly richer, more intense caramel note.
The Heart: Caramel and Chocolate
- Soft Candy Caramels: This is where the magic happens! A full bag (around 14-17 ounces) of soft, individually wrapped caramels, like Kraft or Werther's Chewy Caramels, is ideal. The unwrapping can be a bit tedious, but the payoff is worth it. These caramels melt beautifully and retain a soft, gooey texture when cooled, ensuring your bars are easy to slice and enjoy. Absolutely avoid hard candy caramels, as they will re-solidify into an un-sliceable, tooth-breaking mess once baked.
- Chocolate Chips: Semisweet chocolate chips are the classic choice, offering a balanced sweetness that complements the rich caramel without being overpowering. Dark chocolate chips are an excellent alternative if you prefer a less sweet bar with a more pronounced cocoa flavor. We generally recommend steering clear of milk chocolate chips unless you want an intensely sweet bar, as the Carmelita is already quite rich.
The Essentials: Butter, Cream, and Flavor Boosters
- Butter: Unsalted butter is usually preferred in baking as it gives you control over the salt content. However, if you only have salted butter on hand, it works perfectly fine – just be mindful of any additional salt you might add to the crust mixture. Melted butter is key for easily combining with the oat mixture.
- Heavy Cream: Essential for transforming those solid caramels into a silky, pourable sauce. The cream adds richness and ensures the caramel remains soft and gooey after baking.
- Baking Soda, Salt, and Vanilla Extract: Baking soda helps the crust achieve a delicate tenderness, while salt balances the sweetness and enhances all the flavors. Pure vanilla extract adds a crucial layer of aromatic complexity, making your bars taste even more incredible.
Crafting Your Fool-Proof Carmelita Bars: A Step-by-Step Guide
With your ingredients gathered, let's dive into the simple process of creating these heavenly bars. No fancy equipment is needed – just a bowl, a saucepan, and a baking pan!
Step 1: Prepare Your Pan and Crust
First, preheat your oven to 350°F (175°C). Line a 9x13 inch baking pan (or a square 9x9 inch pan for thicker bars) with parchment paper or aluminum foil, leaving an overhang on the sides. This step is crucial for easy removal of the bars later and significantly simplifies cleanup. Trust us, you'll thank yourself!
In a large bowl, combine your flour, rolled oats, brown sugar, baking soda, and salt. Stir well to ensure everything is evenly distributed. Pour in the melted butter and mix until the dry ingredients are thoroughly moistened and a crumbly dough forms. Take about half of this mixture and press it firmly and evenly into the bottom of your prepared pan. A flat-bottomed glass or measuring cup can help you achieve a compact, even layer. Bake this crust for 8-10 minutes, or until lightly golden.
Step 2: Create the Silky Caramel Sauce
While the crust is baking, begin preparing your caramel sauce. Unwrap all those soft candy caramels (this is the most labor-intensive part, we promise!). Place the unwrapped caramels in a small saucepan with the heavy cream. Heat over low to medium-low heat, stirring frequently, until the caramels are completely melted and smooth. The key here is patience – avoid high heat, which can cause the caramel to burn. Once melted, stir in the vanilla extract.
Step 3: Assemble the Layers
Once the bottom crust comes out of the oven, immediately sprinkle an even layer of chocolate chips over the warm crust. The residual heat will help them adhere and begin to melt slightly. Next, carefully drizzle the warm caramel sauce evenly over the chocolate chips. Don't worry if it doesn't cover every single spot perfectly – it will spread as it bakes. Finally, crumble the remaining oat mixture over the caramel layer. Again, some gaps are completely normal and part of the rustic charm of these bars.
Step 4: The Final Bake
Return the pan to the oven and bake for another 18-20 minutes. Keep an eye on them; the crust should be golden brown, and the caramel filling should be visibly hot and bubbling around the edges. Avoid overbaking, which can make the caramel too hard.
Once baked, remove the pan from the oven and here's the most important step for clean slices: allow the bars to cool completely in the pan before cutting. This can take several hours at room temperature, or you can speed up the process by chilling them in the refrigerator. Cooling allows the caramel to set properly, ensuring beautifully structured bars that don't fall apart when sliced.
Tips for Serving, Storing, and Sharing Your Carmelitas
Once your Carmelita Bars are perfectly cooled and sliced, you're ready to enjoy (and share!) your delicious creation.
- Serving: Due to their richness, Carmelita Bars are best enjoyed in smaller portions. Slice them into squares or rectangles that are about 1-2 inches. They pair wonderfully with a cold glass of milk, a hot cup of coffee, or even a scoop of vanilla ice cream. For an extra touch of sophistication, sprinkle a pinch of flaky sea salt over the top of the caramel layer after baking, but before cooling, to enhance the sweet and savory notes.
- Storing: Store leftover Carmelita Bars in an airtight container at room temperature for up to 3-4 days. If you live in a warm climate or want to extend their freshness, they can also be stored in the refrigerator for up to a week. Just let them come to room temperature for a few minutes before serving for optimal chewiness.
- Freezing: These bars freeze exceptionally well! Once completely cooled and sliced, arrange them in a single layer on a baking sheet and freeze until solid. Then, transfer the frozen bars to an airtight freezer-safe container or bag, separating layers with parchment paper. They can be frozen for up to 2-3 months. Thaw at room temperature or in the refrigerator before enjoying.
- Sharing: Carmelita Bars are famous for making friends! They are perfect for potlucks, bake sales, holiday gifts, or simply as a comforting treat for loved ones. Their impressive appearance and addictive taste make them a fantastic hostess gift or a welcome addition to any gathering.
Conclusion
There you have it – the fool-proof guide to creating the most incredible Carmelita Bars. This chewy caramel and chocolate recipe isn't just a dessert; it's an experience. From the buttery, crumbly oat crust to the gooey, rich caramel and the decadent chocolate, every bite is a symphony of flavors and textures. Easy to make and universally loved, these bars are destined to become a staple in your recipe collection. So go ahead, gather your ingredients, follow these simple steps, and prepare to be showered with compliments. Happy baking!
